PsychoPy Builder Tutorial
Getting started
This section demonstrates the purpose of the psychopy-bids plugin.
The aim of the psychopy-bids plugin is to log all experiment events in an events.tsv file that adheres to the BIDS format.
In the following brief Psychopy experiment a fixed text is presented to the participant.
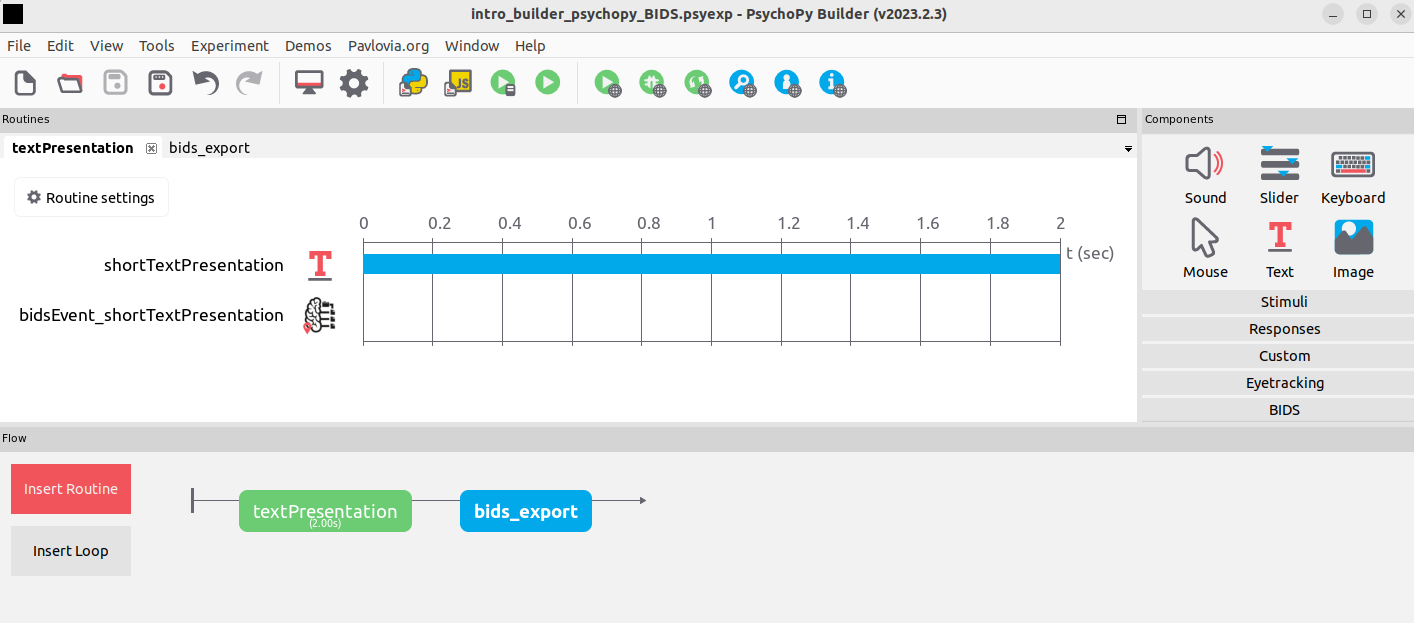
The experiment consists of two routines: the text presentation routine and the BIDS export routine. The text presentation routine includes a PsychoPy text component and the respective BIDS event to log it.
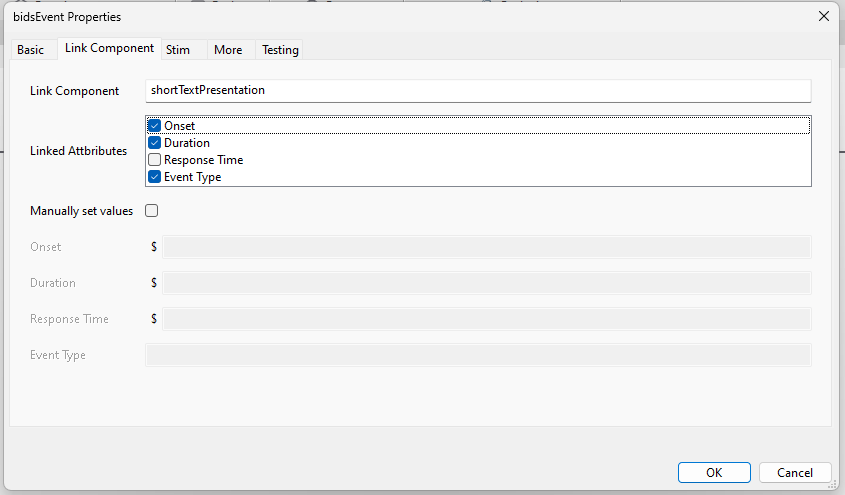
You can link another component to use its onset, duration, response time, and event type attributes. If custom values for onset, duration, or other attributes are needed, you can manually set them. Selecting the Manually Set Values checkbox enables all fields, allowing you to override the linked attributes. However, only the fields you modify will replace the linked attributes, provided those attributes remain selected.
Please note: If Response Time is checked for a component that lacks the .rt attribute, a warning will appear during script runtime.
The onset is the moment the text appears on the screen. The duration is calculated as the end of the routine minus the moment the text appears on the screen.
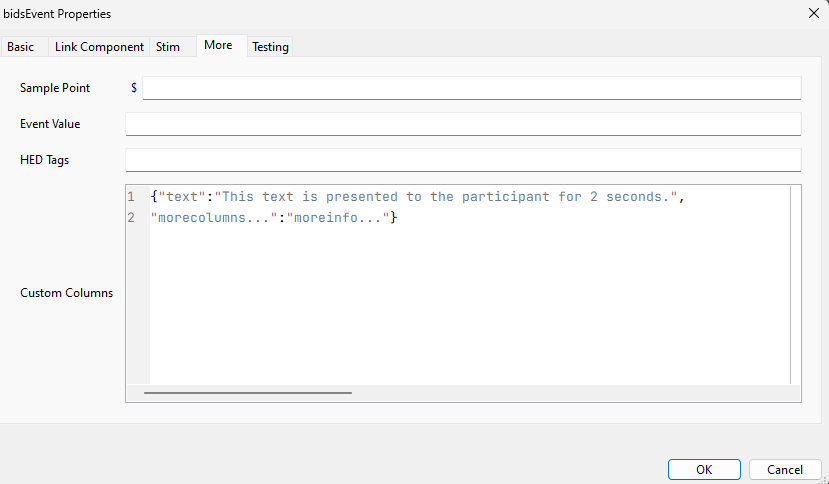
To include more detailed information in the events.tsv file, custom columns can be added under the More tab as a python dictionary.

The final events.tsv file contains one row for one event.
Linked Components
Using linked components allows you to dynamically capture important properties of a component during an experiment. All you need to do is:
- Enter a Valid Component Name: Provide the name of the component you want to link.
- Specify the Required Attributes: Choose the attributes you want to log in your
.tsvfile.
Here are the definitions of the attributes:
Note: You don’t need to configure anything from below. However, understanding how these values are defined can help if you want to manually override them. If .tStopRefresh exists (component ends before routine): If .tStopRefresh does not exist (component ends with routine):⚠️WARNING
The following documentation is outdated. However, it may still be useful if you configure the attributes manually or mix manual attributes with linked ones.
Adding BIDS event for different psychopy components
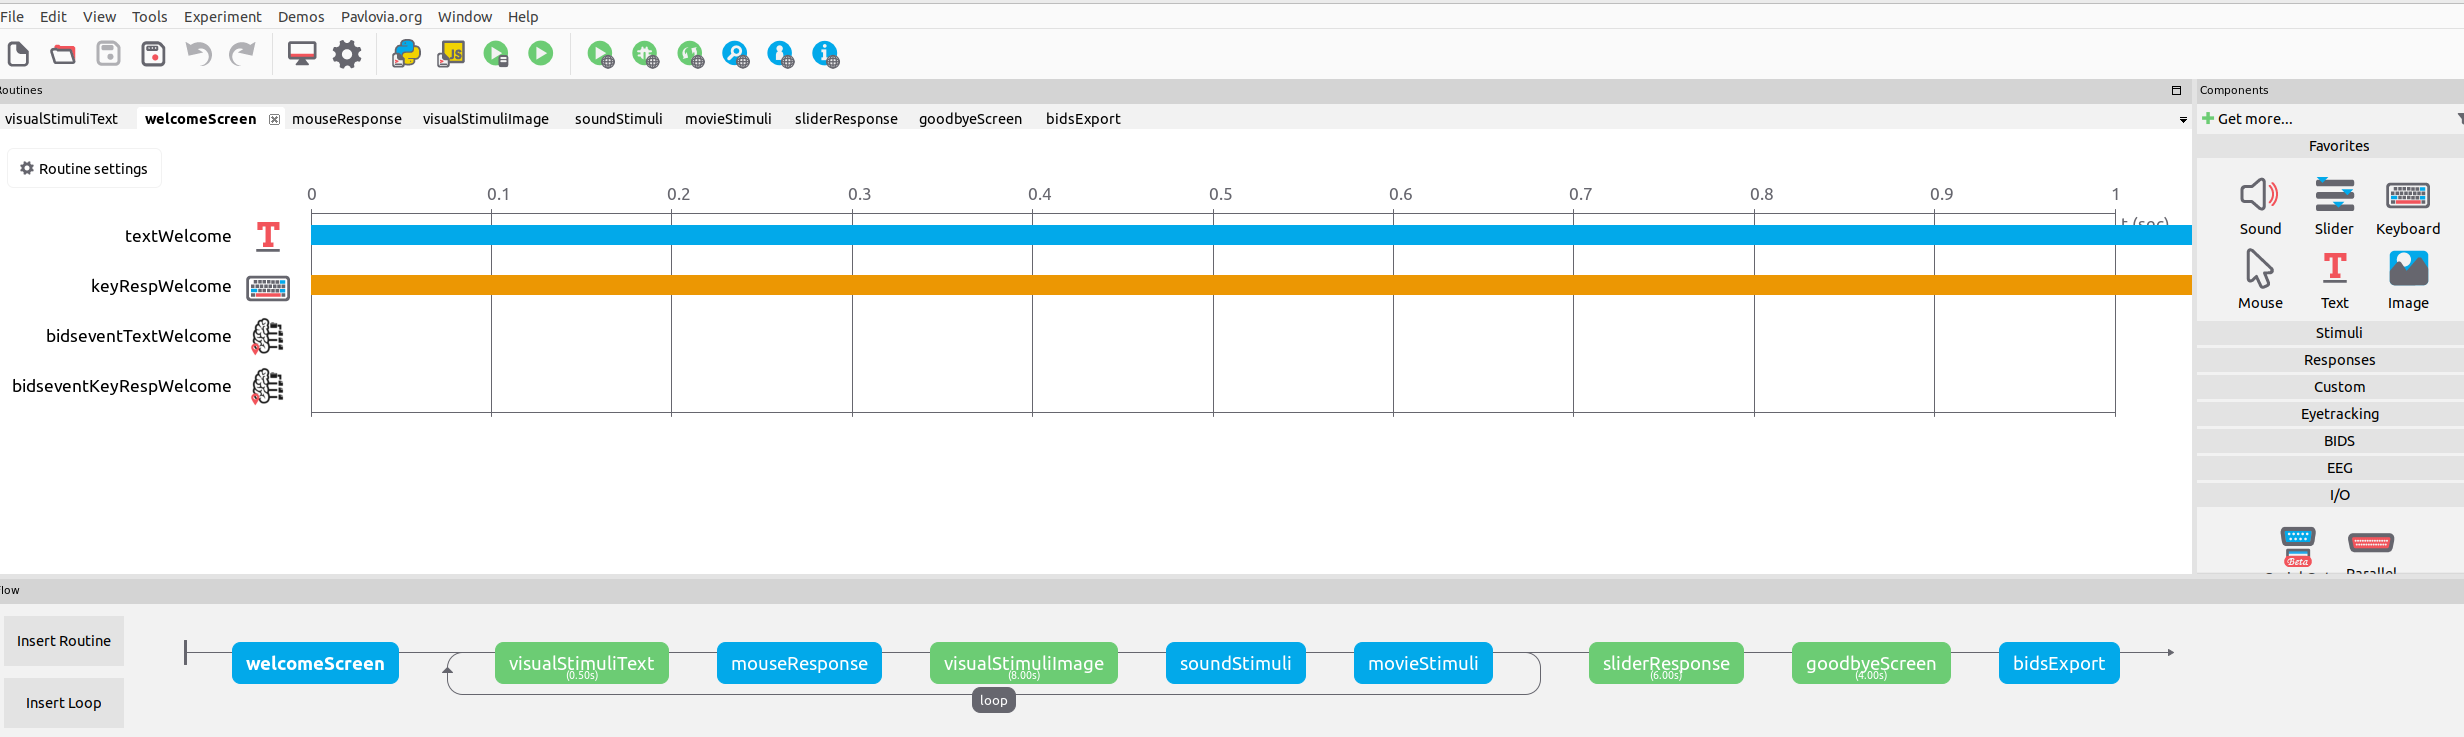
Besides the text component there are many other components in psychopy. To get the right information about these components into the events file the right details needs to be provided to the BIDS event component. In this section we provide a detailed description of how to add this information for different components. For this we use an example experiment.
The example experiment is a template experiment that includes the most frequently used components. It is provided by as a basis for creating your own experiment in a reproducible way. Additional documentation on all the components of the experiment can be found here. The experiment presents images, sound, and movies and takes keyboard, mouse and slider responses. All of these have accompanying BIDS events.
If you want to add specific information about a component to a BIDS event, we also provide a table with psychopy variable names, that store relevant information for each type of component.
The goal of this guide is to show how to use the psychopy-bids plugin. For comprehensive instructions on how to use the PsychoPy builder, please refer to the PsychoPy documentation.
Step 1: Open the example experiment
- Download the example experiment and extract the files from the Gitlab repository.
- Open PsychoPy
- Open the
experiment.psyexp.
- Run the experiment.
Step 2: Create BIDS events
To obtain a comprehensive overview of the experiment, a BIDS event must be created for every event the participant perceives during the experiment. In the provided experiment, all BIDS events have already been implemented. For this tutorial you can follow along with the explanations to understand how the event was created, or delete the respective BIDS event and recreate it.
BIDS events for Text components
The experiment contains the following text components which all have a corresponding BIDS event:
| Routine | Text component | BIDS event |
|---|---|---|
| welcomeScreen | textWelcome | bidseventTextWelcome |
| visualStimuliText | textWord | biseventTextWord |
| mouseResponse | textMouseResponse | bidseventTextMouseResp |
| visualStimuliImage | textImage | bidseventTextImage |
| soundStimuli | textSound | bidseventTextSound |
| goodbyeScreen | textGoodbye | bidsdeventTextGoodbye |
We explain two of these in detail:
- textWelcome: the text component ends after a button press.
- textWord: The text component ends after a given duration.
The remaining event components for text components are created in the same manner.
Text component which ends on button press
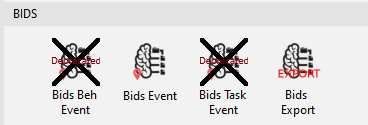
- Add a Bids Event from the components menu on the right to the welcomeScreen routine.
- In the appearing bidsEvent Properties window the following can be specified. Fill in the individual properties of the component with the following values:
| Property | Value | Description |
|---|---|---|
| Name | bidseventTextWelcome |
This component name ensures psychopy can recognize the component, we recommend a unique descriptive name |
| Onset | textWelcome.tStartRefresh |
Onset (in seconds) of the event, measured from the beginning of the experiment |
| Duration | keyRespWelcome.rt |
Duration (in seconds) of the event. In this case the routine is terminated by a key response. The reaction time (.rt) of the subject equals the duration of the event. |
| Trial type | None |
Categorization of each trial |
| Response time | None |
The reaction time of the subject in the trial |
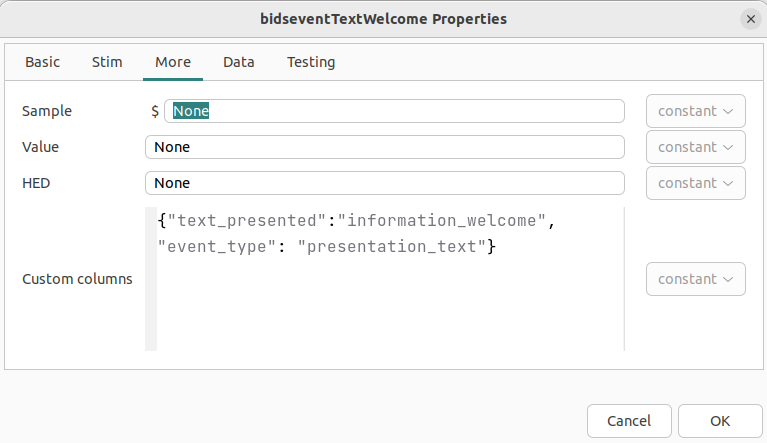
- Add additional characteristics of the event in custom columns under the More tab as a Python dictionary. Here we indicate the event type as presentation of text. We specifically indicate that the presentation was the information welcome text. In this case we do not add the full presented text because this would be too long in the tabular event file.
| Property | Value | Description |
|---|---|---|
| Custom columns | {"text_presented":"information_welcome", "event_type": "presentation_text"} |
Any information about the event can be specified here. In this case it provides info about the event type and about the actual text that is presented to the subject. |
Text component which ends after given duration
- Add a Bids Event from the components menu on the right to the visualStimuliText routine.
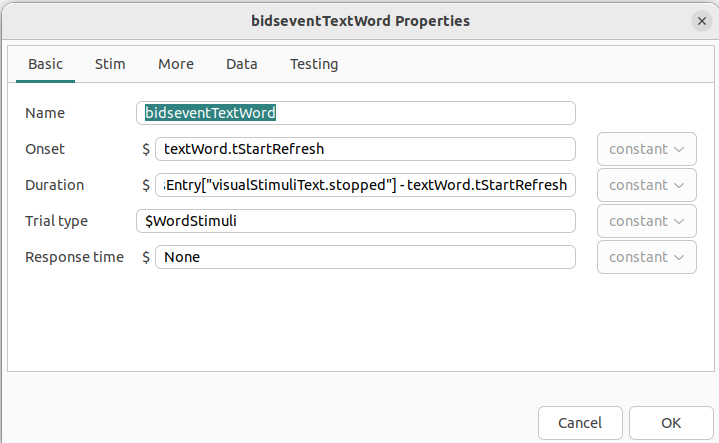
- In the appearing bidsEvent Properties window the following can be specified. Fill in the individual properties of the component with the following values:
| Property | Value | Description |
|---|---|---|
| Name | bidseventTextWord |
The name you want to use to address the component |
| Onset | textWord.tStartRefresh |
Onset (in seconds) of the event, measured from the beginning of the experiment |
| Duration | thisExp.thisEntry["visualStimuliText.stopped"] - textWord.tStartRefresh |
Duration (in seconds) of the event. In this case the routine is terminated by fixed duration set in the textWord component. For the duration of the component the onset is subtracted from end of the visualStimuliText routine. |
| Trial type | $WordStimuli |
Categorization of each trial. In this case the presented Word is used as trial type. |
| Response time | None |
The reaction time of the subject in the trial |
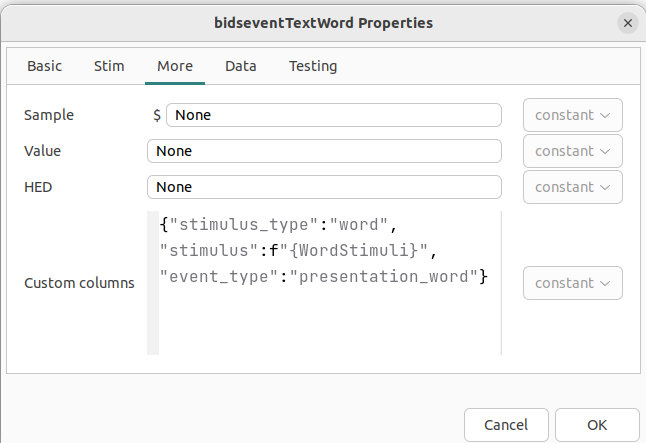
- Add additional characteristics of the event in custom columns under the More tab as a Python dictionary. In this case, we add what type of event occurred, what type of stimulus was presented, and we also provide the stimulus itself. The stimulus itself is set by psychopy based on the
stimulusfile.csvfile. It changes every loop. We indicate the column name as a formatted string. This way the presented word will be added for every loop.
| Property | Value | Description |
|---|---|---|
| Custom columns | {"stimulus_type":"word","stimulus":f"{WordStimuli}", "event_type":"presentation_word"} | Any information about the event can be specified here. In this case it provides info about the stimulus type, the stimulus itself and the event type. |
BIDS events for responses
The following components in the example experiment require responses from the participant.
| Routine | Component | Response type | BIDS event |
|---|---|---|---|
| welcomeScreen | keyRespWelcome | Keyboard | bidseventKeyRespWelcome |
| mouseResponse | mouseResp | Mouse | bidseventMouseResp |
| visualStimuliImage | keyRespImage | Keyboard | bidseventKeyRespImage |
| sliderResponse | sliderResp | Slider | bidseventSliderResp |
Keyboard response
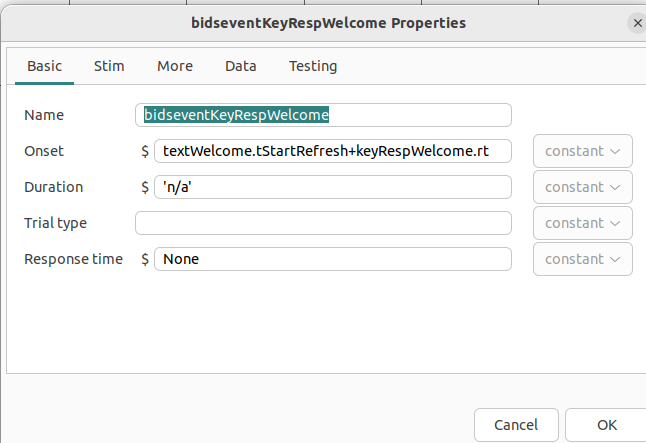
- Add a Bids Event from the components menu on the right to the welcomeScreen routine and select TaskEvent in Properties.
- In the appearing bidsEvent Properties window the following can be specified. Fill in the individual properties of the component with the following values:
| Property | Value | Description |
|---|---|---|
| Name | bidseventKeyRespWelcome | The name you want to use to address the component |
| Onset | textWelcome.tStartRefresh+keyRespWelcome.rt | Onset (in seconds) of the event, measured from the beginning of the experiment. In this case the onset is the sum of when the text appears on the screen and the reaction time of the subject. |
| Duration | 'n/a' | Duration (in seconds) of the event. In this case no duration is available since it is a momentary event. |
| Trial type | None | Categorization of each trial. |
| Response time | None | The reaction time of the subject in the trial |
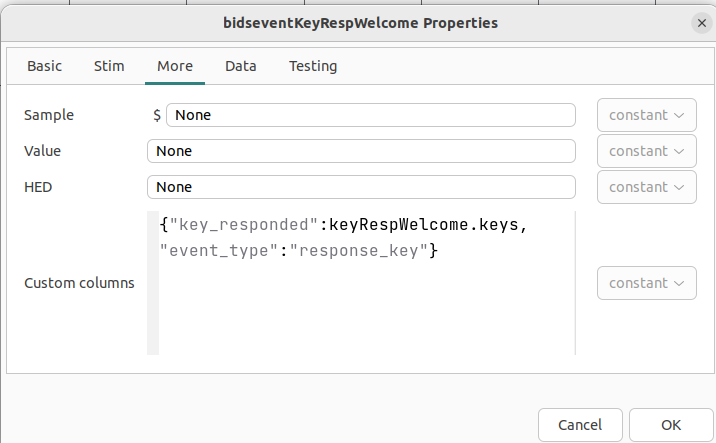
- Add additional characteristics of the event in custom columns under the More tab as a Python dictionary. We are adding the exact keys that the participant pressed, and what type of event it was.
| Property | Value | Description |
|---|---|---|
| Custom columns | {"key_responded":keyRespWelcome.keys, "event_type":"response_key"} |
Any information about the event can be specified here. In this case it provides info which key was responded by the participant and the event type. |
Mouse click response
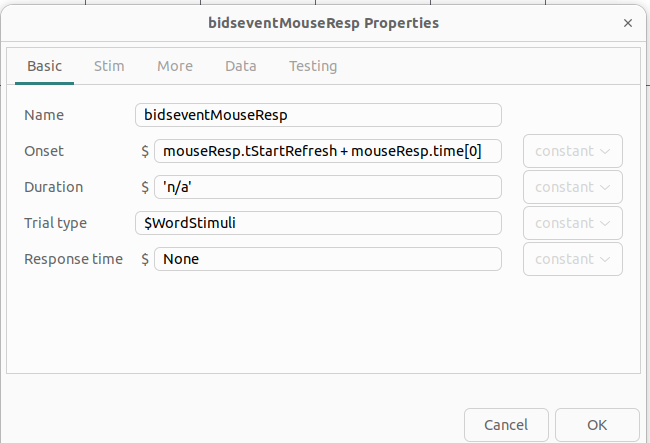
- Add a Bids Event from the components menu on the right to the mouseResponse routine and select TaskEvent in Properties.
- In the appearing bidsEvent Properties window the following can be specified. Fill in the individual properties of the component with the following values:
| Property | Value | Description |
|---|---|---|
| Name | bidseventKeyRespWelcome |
The name you want to use to address the component |
| Onset | mouseResp.tStartRefresh + mouseResp.time[0] |
Onset (in seconds) of the event, measured from the beginning of the experiment. In this case the onset is the sum of the time when it is possible to click on the screen and the reaction time of the subject. |
| Duration | 'n/a' |
Duration (in seconds) of the event. In this case we do not specify a duration because we do not measure the duration of the response. |
| Trial type | $WordStimuli |
Categorization of each trial. In this case the word is used to identify the trials. |
| Response time | None |
The reaction time of the subject in the trial |
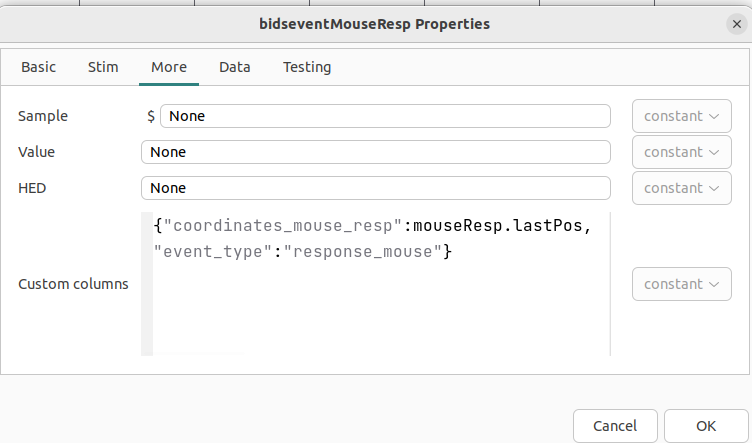
- Add additional characteristics of the event in custom columns under the More tab as a Python dictionary. Here we add the event type and the coordinates of the mouse response.
| Property | Value | Description |
|---|---|---|
| Custom columns | {"coordinates_mouse_resp":mouseResp.lastPos, "event_type":"response_mouse"} |
Any information about the event can be specified here. In this case it provides info about the screen position of the mouse pointer in the moment of response by the participant and the event type. |
Slider response
- Add a Code component from the components menu on the right to the sliderResponse routine.
In order to properly capture the onset of the slider response we need to add a code component to extract it. This is because the user may not always respond to the slider. We need to deal with the case where there is no response.
- In the code component, fill in the following python code under the End Routine tab:
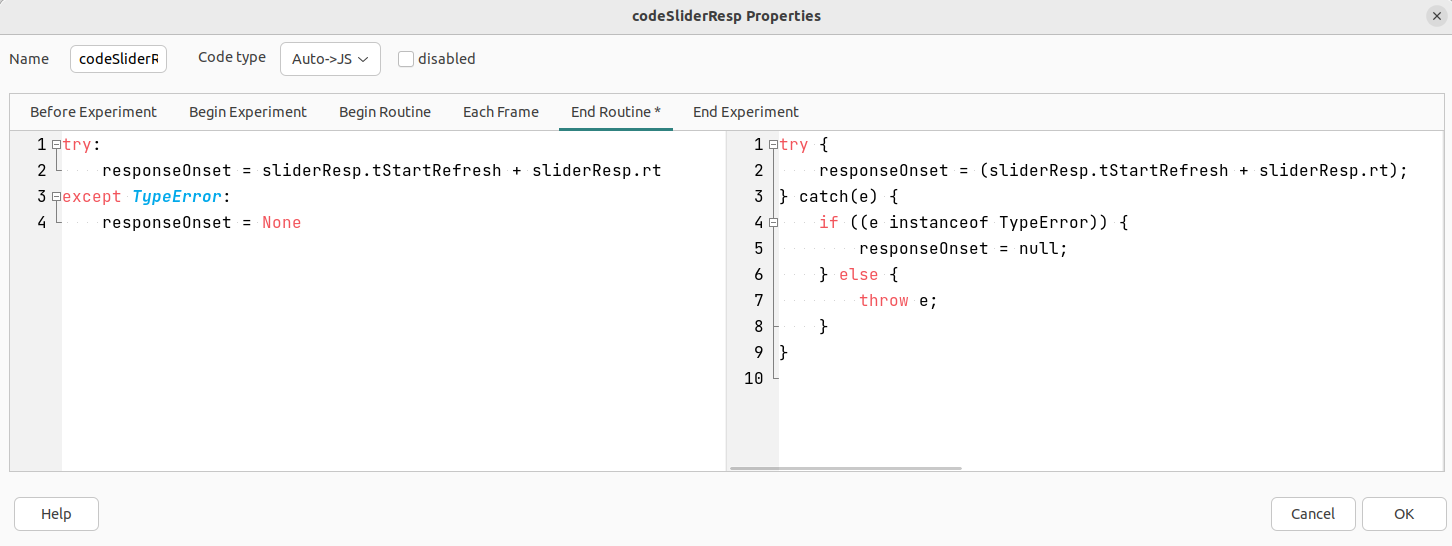
try:
    responseOnset = sliderResp.tStartRefresh + sliderResp.rt
except TypeError:
    responseOnset = None
The objective of this code is to calculate in the "" tab the responseOnset variable. Additionally, if a TypeError occurs, the responseOnset variable should be set to None.
- Add a Bids Event from the components menu on the right to the sliderResponse routine and select TaskEvent in Properties.
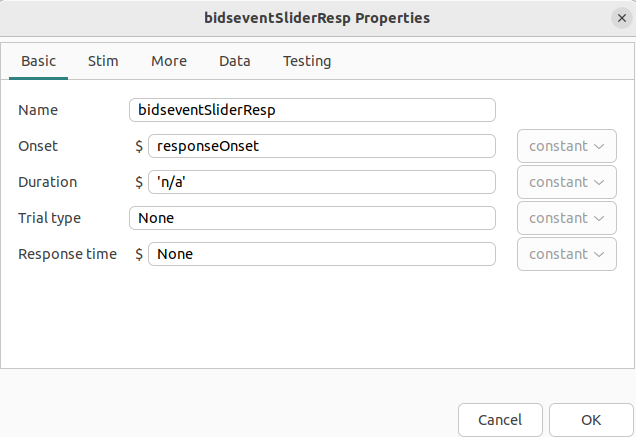
- In the appearing bidsEvent Properties window the following can be specified. Fill in the individual properties of the component with the following values:
| Property | Value | Description |
|---|---|---|
| Name | bidseventSliderResp |
The name you want to use to address the component |
| Onset | responseOnset |
Onset (in seconds) of the event, measured from the beginning of the experiment. In this case the onset has to be calculated - see below. |
| Duration | 'n/a' |
Duration (in seconds) of the event. In this case we do not measure the duration of the event. |
| Trial type | None |
Categorization of each trial. In this case the word is used to identify the trials. |
| Response time | None |
The reaction time of the subject in the trial |
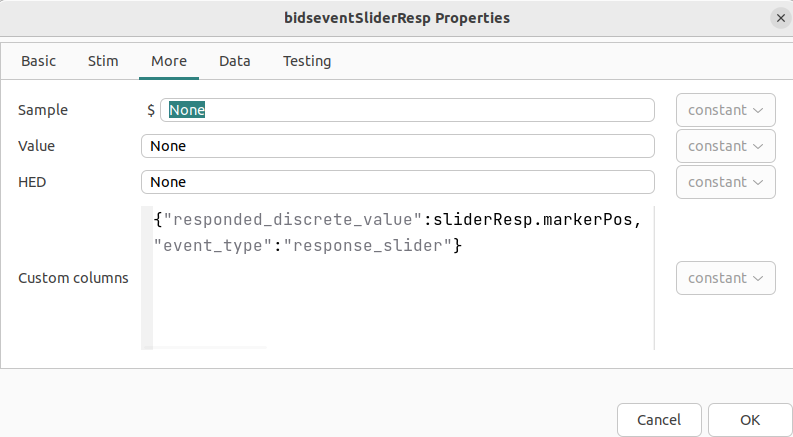
- Add additional characteristics of the event in custom columns under the More tab as a Python dictionary. We are adding the response to the slider by getting the last position of the slider marker and what type of event it was.
| Property | Value | Description |
|---|---|---|
| Custom columns | {"responded_discrete_value":sliderResp.markerPos, "event_type":"response_slider"} |
Any information about the event can be specified here. In this case it provides info about the marker position on the slider. |
BIDS events for different stimuli presentation modalities
The following components in the example experiment contain other modalities that text presentation.
| BIDS event | Component | Modality | Routine |
|---|---|---|---|
| bidseventImagePresentation | imagePresentation | Image | visualStimuliImage |
| bidseventSoundPresentation | soundPresentation | Audio | soundStimuli |
| bidseventMoviePresentation | moviePresentation | Movie | movieStimuli |
For each of these, the BIDS events are created in the same way. We explain one in detail.
Image presentation
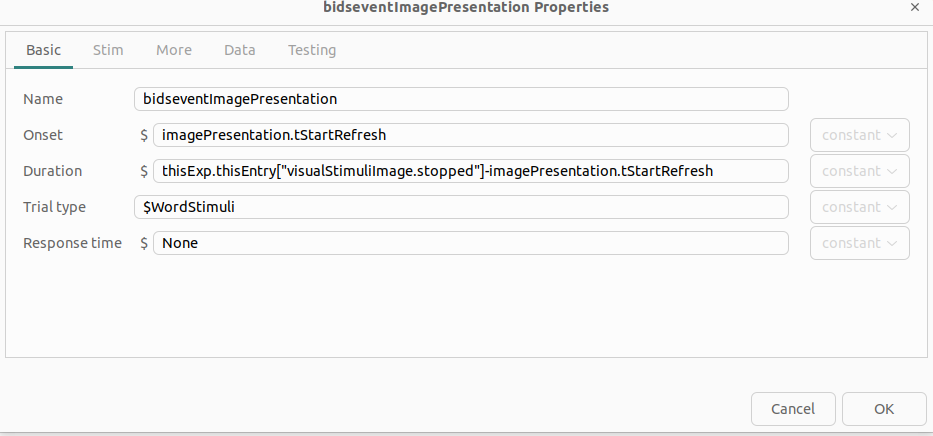
- Add a Bids Event from the components menu on the right to the visualStimuliImage routine and select TaskEvent in Properties.
- In the appearing bidsEvent Properties window the following can be specified. Fill in the individual properties of the component with the following values:
| Property | Value | Description |
|---|---|---|
| Name | bidseventImagePresentation |
The name you want to use to address the component |
| Onset | imagePresentation.tStartRefresh |
Onset (in seconds) of the event, measured from the beginning of the experiment. In this case the onset is the appearance of the image. |
| Duration | thisExp.thisEntry["visualStimuliImage.stopped"]-imagePresentation.tStartRefresh |
Duration (in seconds) of the event. In this case the presentation of the image has a fixed length and the duration is the difference between the appearance of the image and the end of the routine. |
| Trial type | $WordStimuli |
Categorization of each trial. In this case the word is used to identify the trials. |
| Response time | None |
The reaction time of the subject in the trial |
- Add additional characteristics of the event in custom columns under the More tab as a Python dictionary. Here we add the type of event, the stimulus type, and a label of the specific image that was shown based on the
stimulusfile.csvfile.
| Property | Value | Description |
|---|---|---|
| Custom columns | {"stimulus_type":"image", "stimulus":f"{ImageStimuli}","event_type":"presentation_image"} |
Any information about the event can be specified here. In this case it provides info about the stimulus type, the stimuli itself and the event type. |

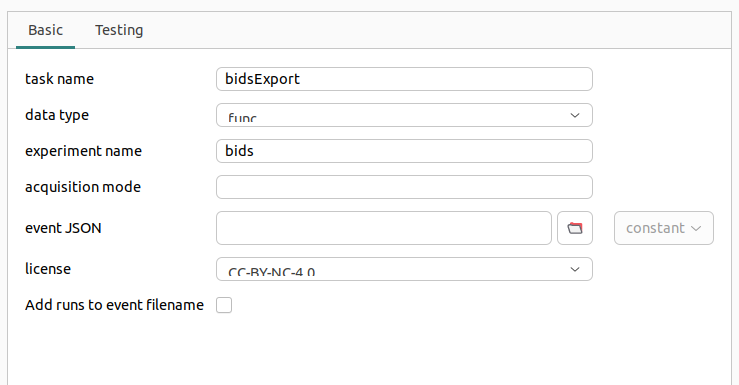
Step 3: Create BIDS export routine
In order to save your previously defined events in a suitable structure, a BIDS Export routine must be defined. You can also find this in the menu on the right. For this example, leave all default settings and append your routine at the end of the experiment flow.
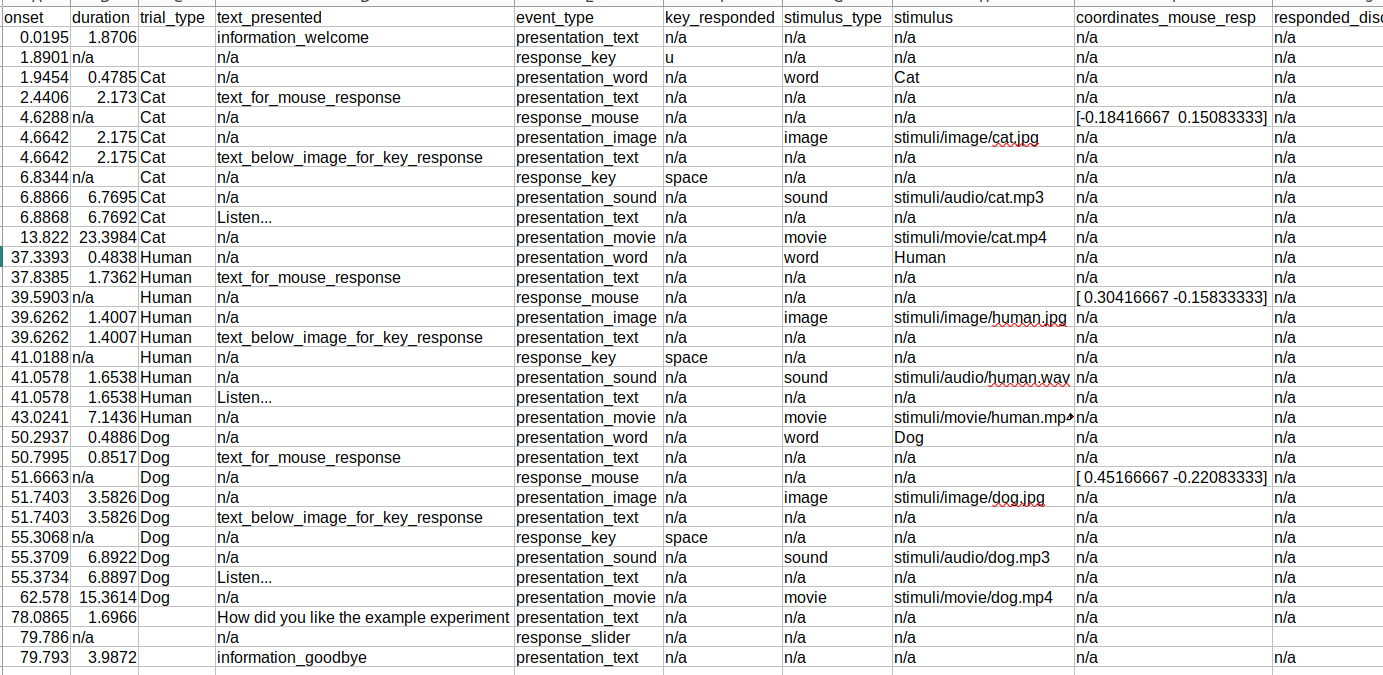
Step 4: Run experiment and check output
After running the experiment the resulting event file should look like this:
The .tsv file should be stored together with a corresponding .jsonfile according to the following structure:
.
├── experiment/
│   └── bids/
│       ├── Changes
│       ├── dataset_description.json
│       ├── participants.json
│       ├── participants.csv
│       ├── README.md
│       └── sub-01/
│           └── ses-01/
│               └── beh/
│                   ├── sub-01_ses_01_task-experiment_run1_events.json
│                   └── sub-01_ses_01_task-experiment_run1_events.tsv
└── ...
and contain all the fields we indicated in the BIDS events:
Component table
When running an experiment created by the psychopy builder, the builder generates a python script that handles the experiment. Information about events is stored in python variables throughout the script. In order to get this information into the BIDS event files you have to pass the right variable names to the bids event component.
Information can be stored with the Routine, or with a Component. Routine names can be found in the flow diagram.
Frequently used variables
For most common type of events, fill in the following variables to get the correct value in the bids event file.
Note that not only onset and duration columns are specified by BIDS, the other columns can be names freely if a more descriptive name is available. Names provided in the table are meant to capture a general category.
| BIDS column | Event type | Variable |
|---|---|---|
| onset | visual presentation | thisExp.thisEntry['<COMPONENT_NAME>.started'] or <COMPONENT_NAME>.tStartRefresh |
| duration | visual presentation | (thisExp.thisEntry["<ROUTINE_NAME>.stopped"] - <COMPONENT_NAME>.tStartRefresh) |
| onset | response | thisExp.thisEntry['<COMPONENT_NAME>.started'] + (<COMPONENT_NAME>.rt) |
| duration | response | 'n/a' |
| response_value | slider response | SliderTrainingCompassion.markerPos |
| response_value | keyboard response | <COMPONENT_NAME>.keys |
| response_value | mouse response | ` |
Offset value is not exact. Difference is expected to be < 16 ms. If higher accuracy is essential it is necessary to either adapt the builder code, or write the experiment from scratch.
Variables in detail
The following overview list variables written by psychopy when using the builder, when they are created and what they mean exactly.
| Variable name | Written by | Meaning |
|---|---|---|
thisExp.thisEntry['<ROUTINE_NAME>.started'] |
Any routine | Clock time when the routine preparation starts. |
thisExp.thisEntry['<ROUTINE_NAME>.stopped'] |
Any routine | Clock time when the routine ends. Closest estimation to offset time of visual stimuli that end with the end of the routine. |
thisExp.thisEntry['<COMPONENT_NAME>.started'] |
Any visual component (but also keyboard component etc. have to look into) | Exact onset time of a visually presented stimuli |
thisExp.thisEntry[<COMPONENT_NAME>.stopped] |
Any visual component when its ending falls within a routine (so is not equal to the end of a Routine) | Can provide exact offset time, but only if the end of this component is not equal to the end of the routine1. |
<COMPONENT_NAME>.tStartRefresh |
Any visual component | Exact onset time |
<COMPONENT_NAME>.tStop |
Any visual component | Exact offset time, only recorded when visual event ends during and not with the end of a routine. |
<COMPONENT_NAME>.rt |
Any input component | The time between the start of the input component and the time first input was received. |
<COMPONENT_NAME>.keys |
Keyboard component | The keys that were pressed |
-
If the visual component ends before the end of the routine, this value will exist and will represent the exact offset time. It can also be written when multiple visual components are presented until the end of the routine. Specifically, psychopy checks whether a component is meant to end according to its given duration. If multiple components are set to end at the same time, it will check whether they should be ended in order. If insufficient time has passed when it checks the first component, but sufficient time has passed when it checks the next, it will end one component on the next screen refresh, but the routine will not end because the first component has not finished yet. ↩