Psychopy Coder Tutorial
Getting Started
Psychopy BIDS introduces the BIDSHandler object, the BIDSBehEvent object and the BIDSTaskEvent object. The BIDSHandler handles information about your experiment and writes this information into a valid BIDS dataset. The Event objects hold representations of experimental events that are validated against BIDS. These should be passed on to the BIDSHandler to write your event files.
In the following python code we initiate a BIDS dataset and add a few BIDS events.
This results in the following directory structure:
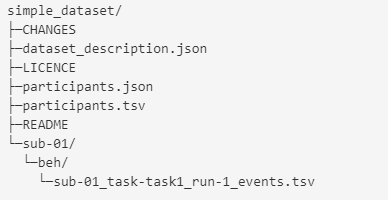
The event file looks as follows:
| onset | duration | trial_type |
|---|---|---|
| 0.0 | 0 | start |
| 0.5 | 5 | presentation |
| 10.0 | 0 | stop |
In the following tutorial we show how to add these objects to existing experiment code.
Stroop Task
In this example, we modified an existing Stroop task by adding code to store the output event data according to BIDS. The provided code can be easily integrated into any existing code using PsychoPy and Python.
The underlying experiment was developed by Dennis Wambacher in the course of the seminar Methods of Technical Experiment Control using Python and PsychoPy. Before you begin, please download the base code here.
Step 1: Creating a BIDS Dataset
To obtain a BIDS dataset directly from the experiment we have to collect the right metadata during the experiment and pass it on to the BIDSHandler to create our dataset.
For this experiment, the participant data is collected from the dialog box. The only required field for BIDS is the participant id. Here we also add participant age and sex.
Next, we initialize the BIDSHandler. The BIDSHandler requires the dataset name (string input). Additionally, we add participant ID, session, task and data_type. This information is necessary to place the data we will collect in the correct structure. Then we create the dataset from the BIDSHandler. This method checks whether a BIDS dataset with corresponding folder structure and necessary files already exist, and creates it if necessary.
Then we initialize an empty list where we'll write our BIDS events before passing it to the BIDSHandler at the end of the experiment.
Step 2: Identify all events
Before we start creating the events, we need to define all the events and what information about them is required.
Anything that happens in a participant's environment is part of their cognitive state, even if it is not directly relevant to the research question. To ensure that no events are missed, consider the following: Events that are not part of an experimental design can be things like the presentation of "get ready" before a trial, a fixation cross between stimuli, or feedback. In addition to logging the events themselves, it is important to also log their properties, such as color and position.
The entities identified for our event file are:
onset: For each event, the start time in seconds must be logged.
duration: The duration of an event in seconds. In this case, for the instruction and stimuli, the duration is equal to the reaction time. Since the duration of a keystroke (the response) is not measured, it will be marked as "n/a".
event_role: The role of the event in the experiment. In this case, we have instructions, responses, fixations, stimuli, and feedback.
word: Here we describe the presented event in more detail. In this example, we add a description of the instruction, the ''+'' presented as fixation, the word presented, and the specific feedback that was presented.
color: Our stimuli and feedback are presented in different colors, so we append a special column to specify the color in which the event was presented. For consistency, we also add it for the instructions.
trial_type: Our experiments consists of two different types of trials: congruent and incongruent, since the color in which the word is presented is either congruent or incongruent with the presented word. It is important to note that the response and feedback are also part of a trial, as the stimulus, response, and feedback form a unit.
trial_number: We have decided to add numbers to the trials in addition to the trail_type. This is convenient to obtain trial level information later.
pressed_key: The particular key pressed by the participant.
response_time: The time taken to respond to a stimulus in seconds.
response_accuracy: Whether the correct response within that trial was given or not.
Step 3: Create the BIDSTaskEvents in Code
Now that we have identified all the events to log in Step 2, we can start adding the BIDSTaskEvents for each event in the code.
BIDSTaskEvents takes the input for an event, i.e. one line in the events.tsv file, and formats it. The minimum required input is the "onset" in seconds (integer or float) and the "duration". As previously stated in Step 2, additional information about an event is necessary. To provide this information, customized columns can be created. Note that custom columns can be named freely but we recommend following BIDS guidelines and use snake case.
We will go through our events in chronological order:
1. Instruction
Note: If custom columns do not apply to a specific event, they may be omitted. Psychopy-bids will automatically fill these columns with "n/a".
2. Response to the Instruction
3. Fixation Cross
4. Stimulus
5. Response to Stimulus
If there was a key press.
6. Feedback to Response
7. Instruction at the End
8. Response to Instruction
Note: To demonstrate the difference in method and output, we retained the csv file of the initial base code to log the events. It is crucial to ensure that the input order for all columns is accurate when using the csv file method. The code lines responsible for generating entries in the csv file could have been removed after the BIDS events were inserted.
Step 4: Add a json sidecar
The events.tsv file should be accompanied by an events.json sidecar that explains the columns in the .tsv file (see BIDS).
We have created a template for the standard input for this experiment, which is then used by psychopy-bids to produce the individual files. The template can be found at the top level of our stroop directory, along with the code.
In our case, the events_template.json file looks like the this:
{
"onset": {
"LongName": "",
"Description": "Onset of the event.",
"Units": "Seconds"
},
"duration": {
"LongName": "",
"Description": "Duration of the presented event.",
"Units": "Seconds"
},
"event_role": {
"LongName": "",
"Description": "The role of the event in the experiment."
},
"word": {
"LongName": "",
"Description": "Text of the presented event."
},
"color": {
"LongName": "",
"Description": "Color of the presented event."
},
"pressed_key": {
"LongName": "",
"Description": "The pressed response key."
},
"trial_type":{
"LongName": "",
"Description": "Type of experimental trial for the experimental condition",
"Levels": {
"congruent": "Word and color match",
"incongruent": "Word and color do not match"
}
},
"response_time": {
"LongName": "",
"Description": "The response time until a key was pressed after the stimulus onset.",
"Units": "Seconds"
},
"trial_number": {
"LongName": "",
"Description": "Number of the trial",
"Units": "Integers"
},
"response_accuracy": {
"LongName": "",
"Description": "Whether the correct response to a stimulus was given or not",
"Levels": {
"correct": "The correct response was given",
"wrong": "The wrong response was given",
"missing": "No response was given"
}
}
}
To use the template, we set it as an existing file for the BIDSHandler:
Step 5: Write BIDS events
At the very end of our experiment code (or if we exit the experiment earlier), we pass the participant information and our list of events to the BIDSHandler. This adds the events.tsv file and the participant file entry. We also create the events.json sidecar file with the template of step 4.
Step 6: Check final Stroop task with added BIDS events, run experiment and check output
After implementing all the steps discussed in the base code, the final code should resemble this:
1 2 3 4 5 6 7 8 9 10 11 12 13 14 15 16 17 18 19 20 21 22 23 24 25 26 27 28 29 30 31 32 33 34 35 36 37 38 39 40 41 42 43 44 45 46 47 48 49 50 51 52 53 54 55 56 57 58 59 60 61 62 63 64 65 66 67 68 69 70 71 72 73 74 75 76 77 78 79 80 81 82 83 84 85 86 87 88 89 90 91 92 93 94 95 96 97 98 99 100 101 102 103 104 105 106 107 108 109 110 111 112 113 114 115 116 117 118 119 120 121 122 123 124 125 126 127 128 129 130 131 132 133 134 135 136 137 138 139 140 141 142 143 144 145 146 147 148 149 150 151 152 153 154 155 156 157 158 159 160 161 162 163 164 165 166 167 168 169 170 171 172 173 174 175 176 177 178 179 180 181 182 183 184 185 186 187 188 189 190 191 192 193 194 195 196 197 198 199 200 201 202 203 204 205 206 207 208 209 210 211 212 213 214 215 216 217 218 219 220 221 222 223 224 225 226 227 228 229 230 231 232 233 234 235 236 237 238 239 240 241 242 243 244 245 246 247 248 249 250 251 252 253 254 255 256 257 258 259 260 261 262 263 264 265 266 267 268 269 270 271 272 273 274 275 276 277 278 279 280 281 282 283 284 285 286 287 288 289 290 291 292 293 294 295 296 297 298 299 300 301 302 303 304 305 306 307 308 | |
Once the experiment has been run for the first time, the folder structure and events file should resemble the following:

| onset | duration | event_role | word | color | pressed_key | trial_type | response_time | trial_number | response_accuracy |
|---|---|---|---|---|---|---|---|---|---|
| 15.2876 | 1.2295 | instruction | instruction_text | black | space | n/a | 1.2295 | n/a | n/a |
| 16.5171 | n/a | response | n/a | n/a | space | n/a | 1.2295 | n/a | n/a |
| 16.538 | 0.5 | fixation | + | black | n/a | n/a | n/a | n/a | n/a |
| 17.0593 | 0.8105 | stimulus | Red | green | left | incongruent | 0.8105 | 1.0 | correct |
| 17.8698 | n/a | response | Red | green | left | incongruent | 0.8105 | 1.0 | correct |
| 17.8972 | 1.0 | feedback | Correct! | green | n/a | incongruent | n/a | 1.0 | n/a |
| 18.9272 | 0.5 | fixation | + | black | n/a | n/a | n/a | n/a | n/a |
The tutorial code and a sample dataset for illustrative purposes are available for download here.